
Overview
In today’s fast-paced business world, working efficiently with partners is essential. Salesforce CPQ (Configure, Price, Quote) and Experience Cloud together can greatly improve the way partners interact with your business. This three-part series will show you how these tools can make partner interactions smoother and more productive. We’ll start by focusing on user automation in the first part.
In “Mastering User Automation,” we’ll look at how automating user-related tasks can save time and reduce mistakes. Key features we’ll cover include setting up user accounts automatically, automating workflows, and sending customized notifications. These tools ensure partners get the right access at the right time, making things easier for everyone.
Key Topics Covered
Automatic User Setup: Make onboarding new partners easier by automating the creation of accounts, assigning roles, and setting access permissions.
Workflow Automation: Speed up routine tasks like approvals, document management, and status updates to keep partner interactions smooth and consistent.
Customized Notifications: Keep partners informed with automated alerts and notifications about important updates and actions they need to take.
Integration with Salesforce CPQ: See how user automation works with CPQ to help partners configure, price, and quote products efficiently.
Real-life Examples and Tips: Learn from real-world examples and get tips on implementing user automation effectively in your business.
By the end of this article, you’ll understand how user automation in Salesforce CPQ and Experience Cloud can improve the partner experience, setting the stage for more in-depth discussions on portal setup and CPQ integration in the next parts of this series.
Use Case Scenario
The goal is to enable a Contact as an Experience Cloud user (Partner portal) so that they can self-serve CPQ quotes and manage other CPQ-related activities using the Partner portal. Typically, user access is managed by an admin through User administration. However, for Experience Cloud users, the process is slightly different. Instead of creating a user record through Setup, you enable it directly through the Contact record.
To set up a Partner user, a Salesforce user needs the ‘Manage External Users’ permission. You also need to add specific buttons and actions on the Contact and Account objects to grant external users access. Usually, this is done manually, but it can be automated for efficiency. In this article, we’ll focus on automating this process using Salesforce Flows.
Notes: Users need Salesforce CPQ licenses specifically configured for partner use. This includes the Salesforce CPQ for Partners permission set, ensuring that partners can utilize CPQ functionalities such as creating and managing quotes.
Now, let’s dive into some action!
Flow Design
Due to a known Salesforce limitation with Mixed DML operations, we can’t update non-setup objects (like Account and Contact) and setup objects (like User) in a single flow. However, we can work around this by processing the requests asynchronously using two separate flows:
Autolaunched No Trigger Flow: This flow handles the creation of User records and assigning permissions/licenses.
Record-Triggered After Save Flow: This flow triggers the above flow as a sub-flow from the Contact record and ensures any necessary validations.
By using these two flows, we can effectively manage the process without running into Salesforce’s limitations.
Autolaunched No Trigger Flow
Start with creating a few variables that will be used as input in the record-triggered flow.
contactId: A Text Variable to accept Contact Id that’s ‘Available for input’ outside of the flow, to be used as an input in the record-triggered flow.
userId: A Text Variable that’s ‘Available for input’ outside of the flow, to be used to store the User Id after creating the user record and then pass it to assign license and permission set in the same flow.
Create two formula resources for Alias and Nickname in user record creation. These two fields on user record are required and should be unique. You can come up with you own logic, but a simple formula is to get the first letter of first name and concatenate with last name (of the contact. To get the contact’s first and last names, we will use the Get Record element).
Now that the required variables are created, let’s add the following elements to the flow:
Get Records (Contact Object): To get the contact record for which the partner user has to be created.
- Filter Conditions: All Conditions are Met (And): Id = contactId (variable created above); Leave the rest to default.Get Records (Profile Object): To get the Profile that has to be assigned to the user during User record creation.
- Filter Conditions: All Conditions are Met (And): Name = Partner Community User (Adjust accordingly to the profile name you have created); Leave the rest to default.Get Records (Permission Set Object): To get the CPQ Partner User Permission Set that has to be assigned to the user after User record creation.
- Filter Conditions: All Conditions are Met (And): Label = CPQ Partner User (Adjust accordingly to the permission set name you have created); Leave the rest to default.Create Records (User Object): To create the user record using the contact Id from above. There a number of required fields for creating a user, I will only list a few here.
- How to Set record field values: Manually
- Create a Record of This Object: User
- Set Field Values for the User:
— Alias = Alias formula variable from above
— CommunityNickname = Nickname formula variable from above
— ContactId = {!GetContact.Id} (From Get Contact records element above)
— Email, first Name, Last Name from the Get Contact records element above
— Username: I have assigned the email as user name (by referencing to Get Contact records element), but you can adjust based on your needs.
— ProfileId = Profile Id from Get Profile records element above
- Store the User Id in the UserId variable created above.Get Records (Permission Set License Object): To get the Id of Salesforce CPQ License and then assign to the user created above in the next step.
Create Records (for License assignment): To assign the permission set license using the Id from above Get records element.
Create Records (for Permission Set assignment): To assign the permission set (Partner CPQ Permission set) using the Id from above Get records element.
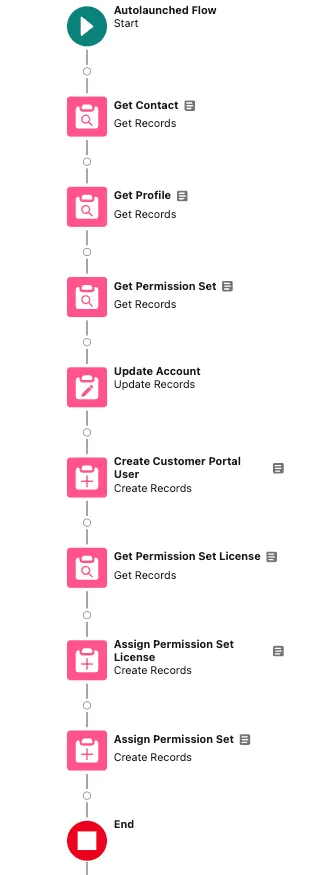
That’s it! You are 75% done with the user creation. Next let’s get the record triggered after save flow set up.
Note that the same flow with minor changes can be used for automating Customer community portal user creation or general Salesforce platform user creation.
Record-Triggered After Save Flow
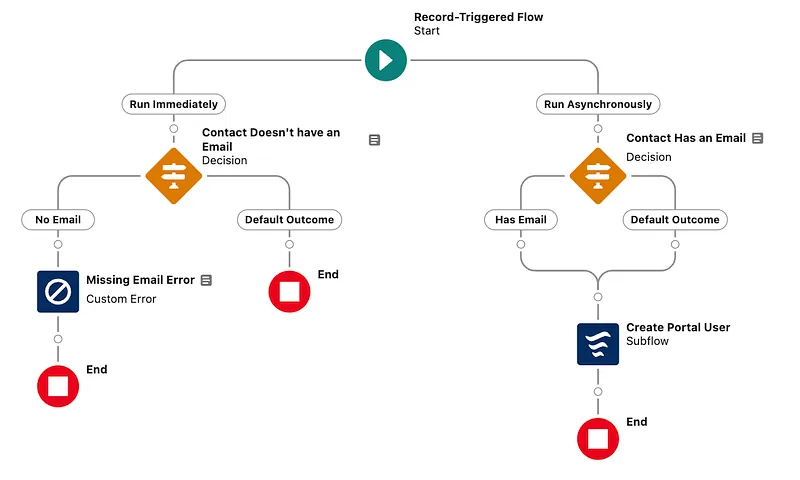
Next create a Record-Triggered flow on Contact object whenever a contact is created or updated. As we cannot have every contact that’s created or updated to be an Experience cloud user (partner portal user in this case), we need a condition to trigger. In my case, I have created a checkbox called Experience Cloud user on the contact object. This flow will only be triggered if this checkbox is checked.
Important step: As mentioned earlier, due to the mixed DML operations limitation, now is the time to address this in the flow.
Scroll to the bottom of the ‘Configure Start’ and check the checkbox ‘Include a Run Asynchronously Run path….’, which will add a new path to the start element. One path that runs immediately and the other async. Or you can leverage a schedule path as well.
Below is the screenshot for your reference.
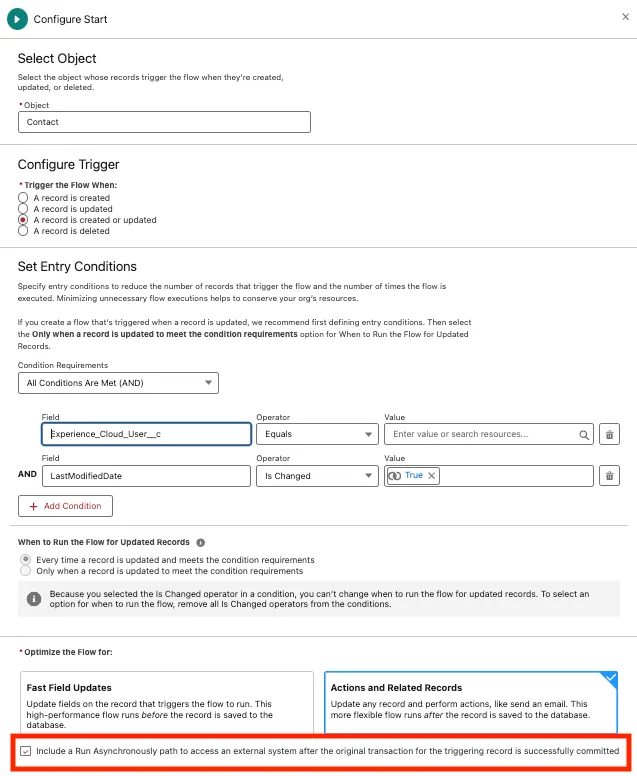
Start Configuration
In the Run immediately path you can include Update the related account’s IsPartner field to true and any validations that should trigger when the checkbox (experience cloud user) is checked — like checking if an email address is present on the contact or not.
In the Run async path, call the Autolaunched no trigger flow as a Subflow with ContactId set as Triggering Contact’s Contact Id.
Voila! That’s all. You have now mastered automation of user record creation through flows and without a single line of apex code.
Let me know what you think of this and any other ideas on how you have achieved this.
In the next part, I’ll cover setting up Experience Cloud with the CPQ Quote object, specifically focusing on the Quote Line Editor.